![]()
Now that I have an ESP32 flashed with MicroPython and subscribed to a topic in AWS IOT Core as shown in my previous blog post here.
Diagram of connection to AWS and how we can now send data to the ESP32 via IOT CORE:
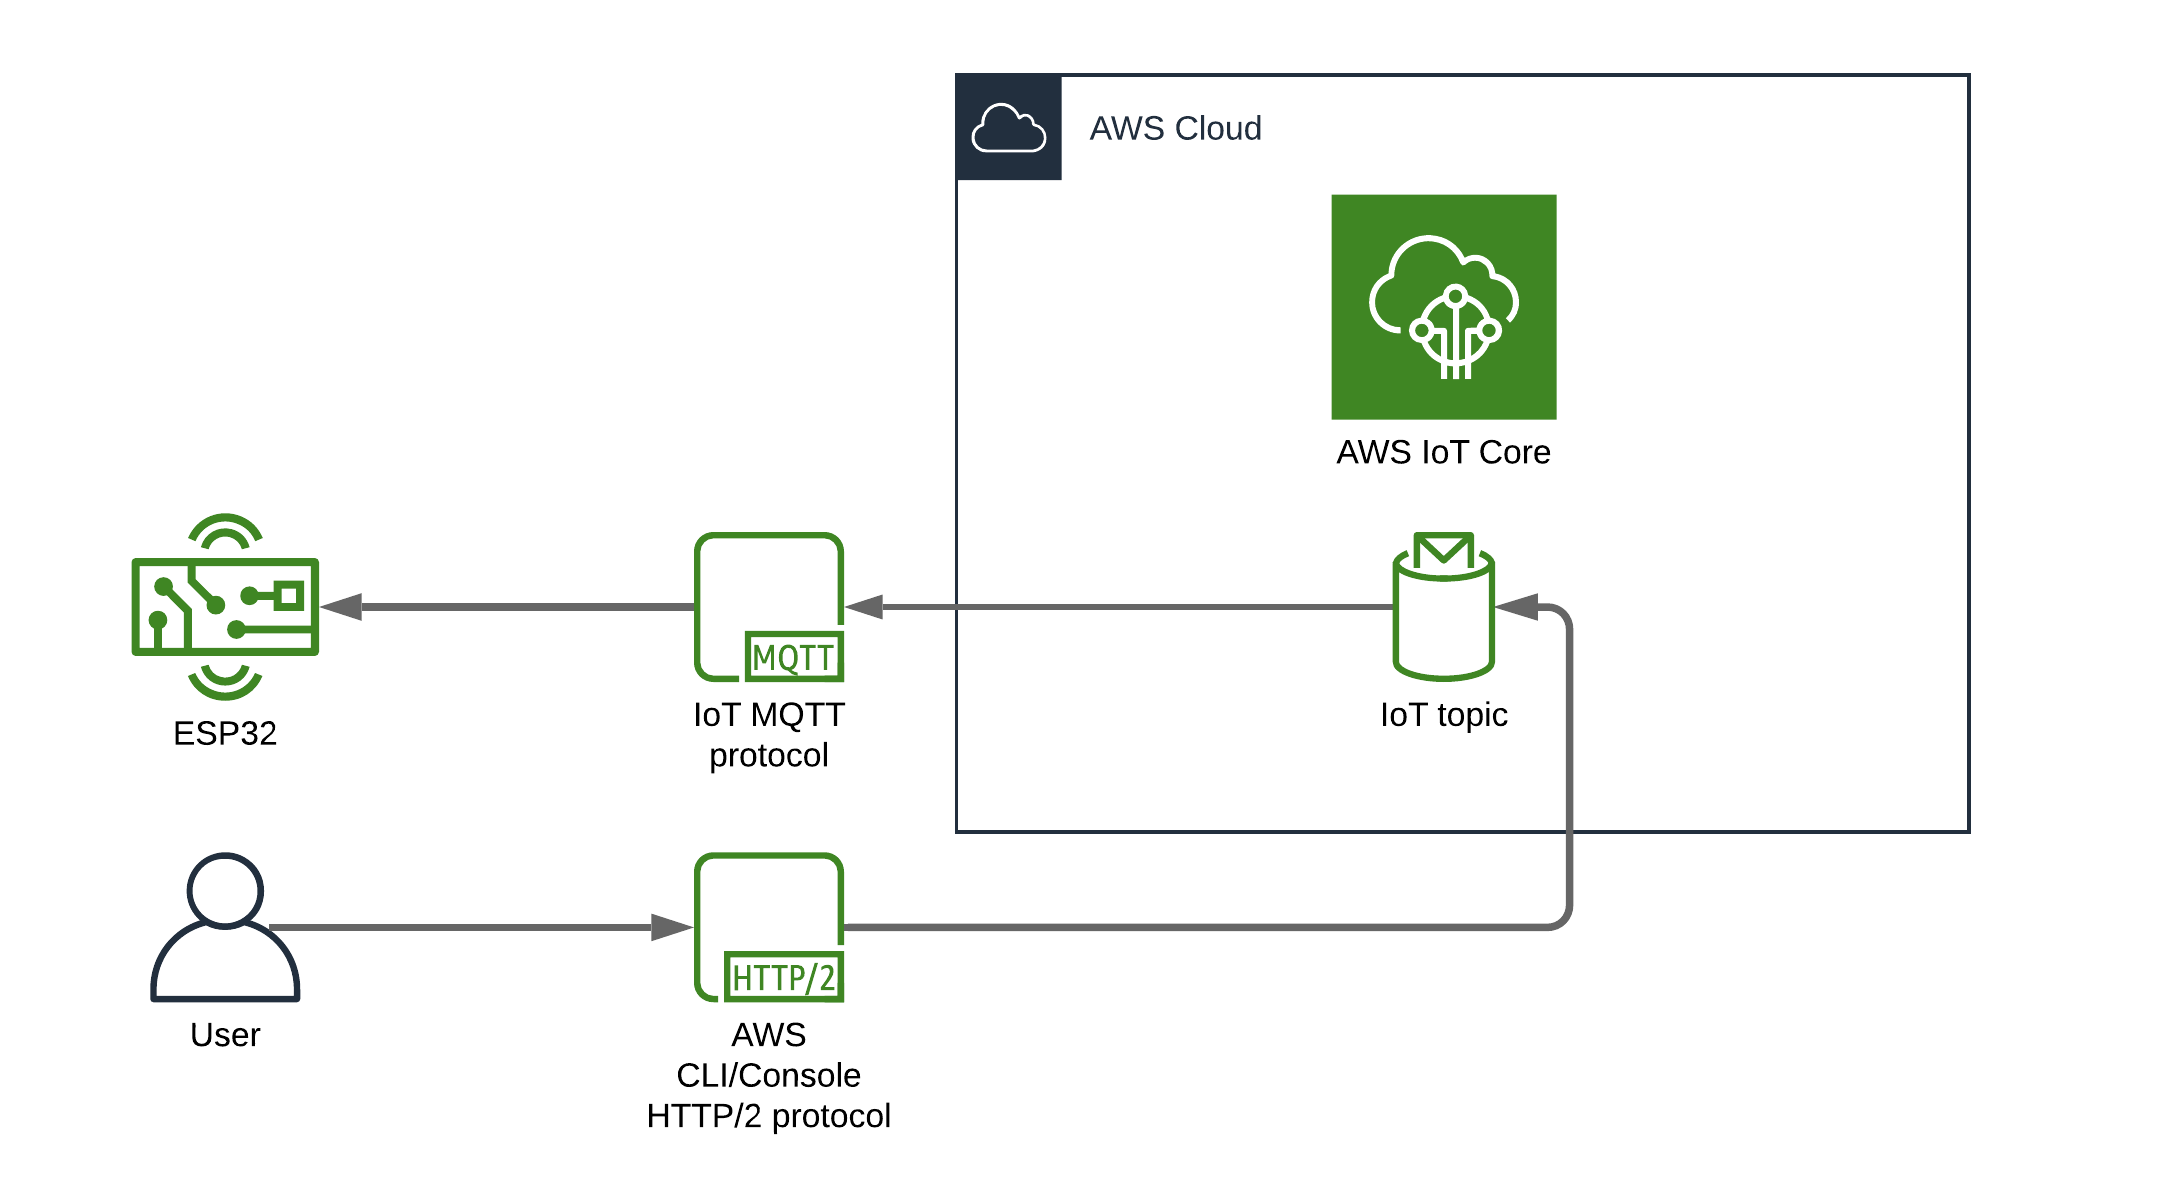
We should use the ESP32 to drive something, ideally something cool and shiny.
Enter the NeoPixel!
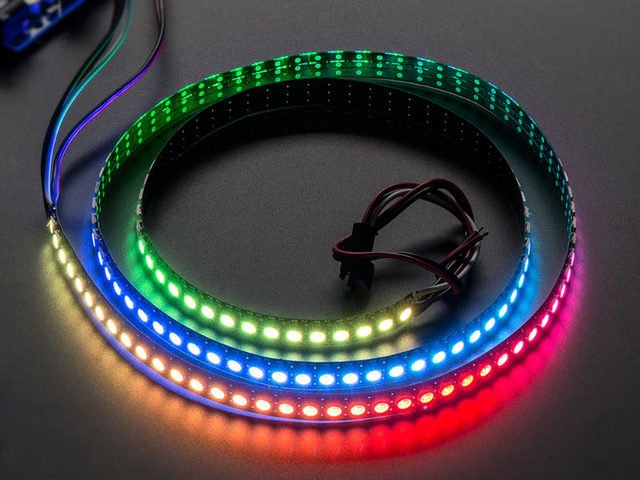
What is a NeoPixel?
According to google:
“NeoPixel” is Adafruit’s brand for individually-addressable RGB color pixels and strips based on the WS2812, WS2811 and SK6812 LED/drivers, using a single-wire control protocol.
Thats awesome, if you want to get into the nitty gritty of it there is a datasheet pdf supplied by adafruit for the WS2812 the WS2811 and the SK6812 LED drivers which are essentially what make the magic happen.
But for those of you who have things to do and just want to make leds glow pretty colours, here is the short version:
Neopixels are individually addressable LEDs on a single string or matrix that can be controlled from a single pin on a microcontroller. This means you can control all of the LEDs colors using the one pin by sending encoded RGB values.
You can control a string of NeoPixels using your favourite development board be it a Raspberry pi, Arduino or in my case an ESP32.
Simply drive both the board and the NeoPixels using the same 5v power supply (USB will do for a small number of pixels) and connect the data in line of the NeoPixels to a standard input/output capable pin on your board.
With an ESP the pin numbers arent always directly clear, use google to find the corresponding pin numbers for you board, in my case the pinout looks like this:
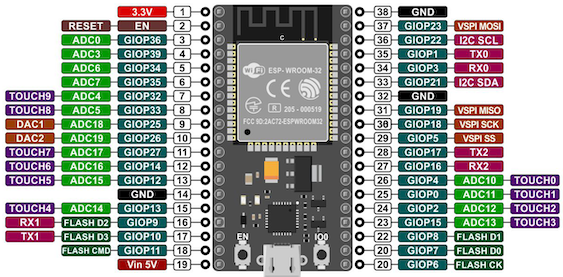
Yours may be different, make sure you do the research because there is nothing more frustrating than debugging code for 15 minutes only to find out the pin numbers are not what you thought they were…
Dont ask me how I know 😡
Anyhow, we hook up the gnd pin of the neopixel string to ESP32 pin 14, the +5V pin to ESP32 pin 19, and the Din (or data in) pin on the neopixel to ESP32 pin 15
That should mean that in the code we simply send neopixel data over GPIO pin 13 and we should see some leds light up.
NeoPixel library
Before we can send any data we will need some form of library to drive the leds, lucky for us MicroPython comes with all the libraries you might want including a neopixel library.
Lets give it a test run to see how this works.
First we connect to the ESP32 again using the RSHEL tool (for instructions on how to set this up refer to my previous blog post).
Then we execute the following python code:
1
2
3
4
5
6
import machine, neopixel
np = neopixel.NeoPixel(machine.Pin(13), 8)
np[0] = (255, 0, 0) # set to red, full brightness
np[1] = (0, 128, 0) # set to green, half brightness
np[2] = (0, 0, 64)  # set to blue, quarter brightness
np.write()
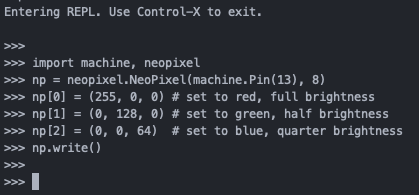
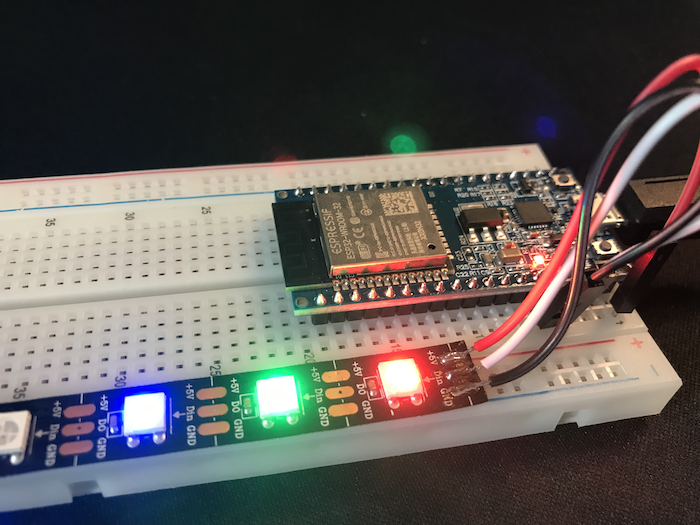
Success!
Now this is slightly boring, surely we can do better than this. To quickly demonstrate what is possible and have a nerdy throwback to the 80’s (showing your age there Marty!) lets write and deploy some fun code that should look familiar to my fellow gen-x’ers..
1
2
3
4
5
6
7
8
9
10
11
12
13
14
15
16
17
18
19
20
21
import machine
import neopixel
from time import sleep

LEDCOUNT = 8
LEDPIN   = 13
DELAY    = 0.1
np = neopixel.NeoPixel(machine.Pin(LEDPIN), LEDCOUNT)

if __name__ == '__main__':
  while True:
    for i in range(LEDCOUNT):
      np.fill((0,0,0))
      np[i] = (255,0,0)
      np.write()
      sleep(DELAY)
    for i in range(7,0,-1):
      np.fill((0,0,0))
      np[i] = (255,0,0)
      np.write()
      sleep(DELAY)
Can you guess from reading the code what it does?
Pretty cool right? Now who does that remind you of?

Or you know, if David Hasselhoff is more your style…

Back to the cloud!
Ok Great, we made some led blink, but that is not why you are here, we want to see cool cloud integration, lets get to work.
As you will have read in my previous blog post I managed to get the ESP32 hooked up to AWS IOT CORE, and better yet, it would subscribe to a topic and listen for messages, pretty awesome. The obvious question becomes, how can we integrate the NeoPixel into this? the initial answer is obvious:
When working with development boards such as the ESP32 there is no direct communications interface with the end user. When developing and testing new code there is the serial usb interface for reading serial outputs to get an idea of what is going on. The end user will not be using the board connected to a computer, so we need a means of communicating what is happening, the Neopixels are ideally suited for this. If you look around your desk or room, I am willing to bet there are heaps of electronic devices that communicate some sort of status with you through the use of LEDS. I have a powerbank to charge my devices that has leds to indicate the level of charge. My Sony camera has an LED on the top which is orange when charging, red when the battery is depleted, and green when the battery is 100% charged. Lets use the Neopixels to indicate whether or not the ESP32 is able to connect to WIFI if it is able to successfully connect to the AWS IOT CORE endpoint, and if it has subscribed to the topic.
1
2
3
4
5
6
7
8
9
10
11
12
13
14
15
16
17
18
19
20
21
22
23
24
25
26
27
28
29
30
31
32
33
34
35
36
37
38
39
40
41
42
43
44
45
46
47
48
49
50
51
52
53
54
55
56
57
58
59
60
61
62
63
64
65
66
67
68
69
70
import time
from umqtt.simple import MQTTClient
import json
import machine
import neopixel

SSID        = 'SSID'
PASS        = 'SSID-PASSPHRASE'
THING_NAME  = 'ESP32'
TOPIC       = 'ESP32/sub'
ENDPOINT    = 'ENDPOINT_ID.iot.REGION.amazonaws.com'
ROOT_CA     = open('./AmazonRootCA1.pem', 'r').read()
CERTIFICATE = open('./certificate.pem.crt', 'r').read()
PRIVATE_KEY = open('./private.pem.key', 'r').read()
SSL_CONFIG  = {'key': PRIVATE_KEY,'cert': CERTIFICATE, 'server_side': False}
LEDCOUNT    = 8
LEDPIN      = 13

np = neopixel.NeoPixel(machine.Pin(LEDPIN), LEDCOUNT)

def yellowPixel(lednumber):
  np[lednumber] = (128,128,0)
  np.write()

def greenPixel(lednumber):
  np[lednumber] = (0,128,0)
  np.write()

def redPixel(lednumber):
  np[lednumber] = (128,0,0)
  np.write()

def connect_wifi():
  import network
  sta_if = network.WLAN(network.STA_IF)
  if not sta_if.isconnected():
    print('Connecting to network...')
    yellowPixel(0)
    sta_if.active(True)
    sta_if.connect(SSID, PASS)
    while not sta_if.isconnected():
      pass
  print('Connected to network...')
  greenPixel(0)
  print('network config:', sta_if.ifconfig())

def message_callback(topic, message):
  message = json.loads(message)
  print(message)

def connect_iot_core():
  print('Connecting to: {}'.format(ENDPOINT))
  yellowPixel(1)
  mqtt = MQTTClient( THING_NAME, ENDPOINT, port = 8883, keepalive = 10000, ssl = True, ssl_params = SSL_CONFIG )
  mqtt.connect()
  mqtt.set_callback(message_callback)
  print('Connected to: {}'.format(ENDPOINT))
  greenPixel(1)
  mqtt.subscribe(TOPIC)
  print('Subscribed to topic: {}'.format(TOPIC))
  greenPixel(2)
  return mqtt

if __name__ == '__main__':
  np.fill((0,0,0))
  connect_wifi()
  subscription = connect_iot_core()
  while True:
    subscription.wait_msg()
    time.sleep(1)
As you can see I have added a few more functions called def greenPixel, yellowPixel and redPixel. These functions are called at specific steps in the connect_wifi and the connect_iot_core functions to indicate a successful connection or subscription. The first tree pixels in the string now correspond with:
- Wifi connection successful?
- IOT_CORE connection successful?
- IOT_CORE topic subscription successful?
Lets try it out.
Nice…
Now we can tell the connection status of the device without the need for a serial connection. Lets move on and put that IOT CORE topic subscription to good use.
Sending data via IOT CORE.
Using the Neopixel library, we can set the values of the led’s or “pixels” using an RGB value in a decimal format. Some examples are:
- RED: 255,0,0
- GREEN: 0,255,0
- BLUE: 0,0,255
Or any combination thereof, the internet is riddled with rgb reference tables or tools, Macos even comes with the digital colour meter which will give you RGB values when you hover over colours. If my neopixel ledstrip has 8 led’s and each led’s color and brightness is defined by a RGB tuple, the entire ledstrip could be Programmatically represented by a list of list data structure. For example:
1
2
3
4
5
6
7
8
9
10
[
  [148,0,211],
  [75,00,130],
  [0,0,255],
  [0,128,255],
  [0,255,0],
  [255,255,0],
  [255,127,0],
  [255,0,0]
]
This list of RGB values would make a lovely rainbow pattern. Getting this on the ESP32 would be easy enough, but suppose I want to change the pattern to something different later on. This is where having the ESP32 connected to AWS IOT CORE becomes really exciting.
If you recall the code we started with from the previous blog post, the one we modified to have status leds, there is a particular function in there that is very interesting. Namely the message_callback function. This function gets called every time the connect_iot_core function gets a message with 2 parameters, the topic name and the data. It is declared in this line in the function: mqtt.set_callback(message_callback). It would be easy enough to extend upon this function to have it interpret different data within the message in different ways.
First we redesign the message_callback function to look for a leddata key in the JSON data by adding the following conditional statement:
1
2
3
4
5
6
7
def message_callback(topic, message):
  message = json.loads(message)
  print(message)
  if 'leddata' in message:
    for i in range(len(message['leddata'])):
      np[i] = message['leddata'][i]
    np.write()
This conditional statement gets triggered if there is a leddata object in the JSON. It will then iterate over the leddata data using a for loop. then it will call the np object which is an instantiating of the neopixel.NeoPixel class. It will reference the Neopixel led number “i” based on the location of the data in the list [0-7]. It sets the pixel’s RGB value by passing in the RGB list object. And finally it calls the np.write() method in the np class which tells the ESP32 to send a signal to the neopixel string to define the LED values.
Demonstration:
Modify the code so that your message_callback function resembles the one above.
Write the new file to your ESP32 using the rshell utility as shown before.
Turn on the ESP32 and wait for all three LED’s to turn green, indicating successful connection and topic subscription.
Open your web browser and go to the AWS IOT CORE console
Go to the test menu item and click on the “publish to a topic” tab.
Enter the correct “topic name” and paste the following JSON string in the message payload window:
1
2
3
4
5
6
7
8
9
10
11
12
13
{
  "message": "Here is a led rainbow.",
  "leddata": [
    [148,0,211],
    [75,00,130],
    [0,0,255],
    [0,128,255],
    [0,255,0],
    [255,255,0],
    [255,127,0],
    [255,0,0]
  ]
}
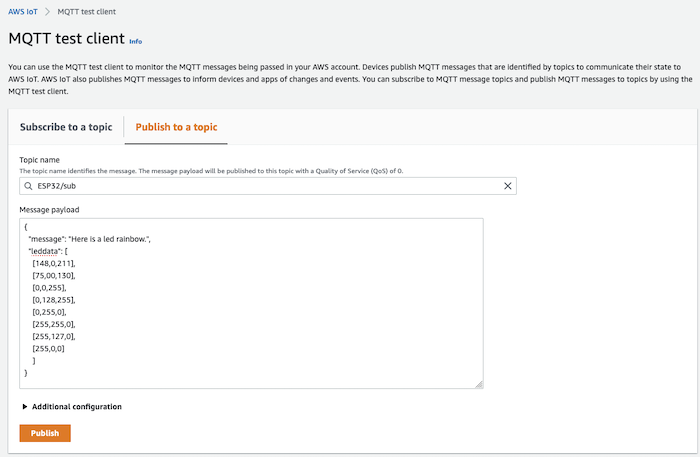
Click “publish and…
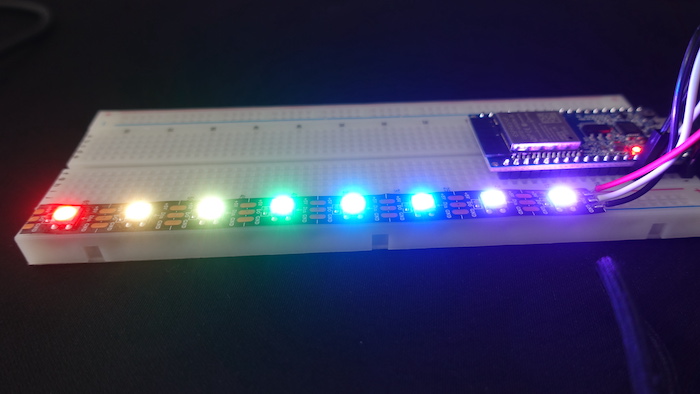
Success!!!
Lets play with that a little.
I have written a little shell script that uses the AWS CLI IOT-CORE publish command to send json string to my IOT CORE topic directly from my terminal.
Here is the Amazon doc page on iot-data AWS cli.
This is my shell script, nothing fancy, it just sends bas64 encoded JSON as payload to the IOT CORE endpoint topic with a set pause in between.
1
2
3
4
5
6
7
8
9
10
11
12
13
14
15
16
17
18
19
20
21
22
23
24
#!/usr/local/bin/bash
# base64 encoded json strings:
export RAINBOW='eyJtZXNzYWdlIjoiU29tZXdoZXJlIG92ZXIgdGhlIHJhaW5ib3cuIiwibGVkZGF0YSI6W1sxNDgsMCwyMTFdLFs3NSwwMCwxMzBdLFswLDAsMjU1XSxbMCwxMjgsMjU1XSxbMCwyNTUsMF0sWzI1NSwyNTUsMF0sWzI1NSwxMjcsMF0sWzI1NSwwLDBdXX0K'
export RED='eyJtZXNzYWdlIjoiVGhlIHJlZCBtZW5hY2UuIiwibGVkZGF0YSI6W1syNTUsMCwwXSxbMjU1LDAsMF0sWzI1NSwwLDBdLFsyNTUsMCwwXSxbMjU1LDAsMF0sWzI1NSwwLDBdLFsyNTUsMCwwXSxbMjU1LDAsMF1dfQo='
export GREEN='eyJtZXNzYWdlIjoiSXRzIG5vdCBlYXN5IGJlaW5nIGdyZWVuLiIsImxlZGRhdGEiOltbMCwyNTUsMF0sWzAsMjU1LDBdLFswLDI1NSwwXSxbMCwyNTUsMF0sWzAsMjU1LDBdLFswLDI1NSwwXSxbMCwyNTUsMF0sWzAsMjU1LDBdXX0K'
export BLUE='eyJtZXNzYWdlIjoiSW0gYmx1ZSBkYWJvb2RlZWRhYm9vZGF5LiIsImxlZGRhdGEiOltbMCwwLDI1NV0sWzAsMCwyNTVdLFswLDAsMjU1XSxbMCwwLDI1NV0sWzAsMCwyNTVdLFswLDAsMjU1XSxbMCwwLDI1NV0sWzAsMCwyNTVdXX0K'
export DARK='eyJtZXNzYWdlIjoiSGVsbG8gZGFya25lc3MgbXkgb2xkIGZyaWVuZC4iLCJsZWRkYXRhIjpbWzAsMCwwXSxbMCwwLDBdLFswLDAsMF0sWzAsMCwwXSxbMCwwLDBdLFswLDAsMF0sWzAsMCwwXSxbMCwwLDBdXX0K'
while true; do
echo Hello darkness my old friend.
aws iot-data publish --topic 'ESP32/sub' --payload ${DARK}
sleep 3
echo The red menace!
aws iot-data publish --topic 'ESP32/sub' --payload ${RED}
sleep 3
echo Its not easy being green.
aws iot-data publish --topic 'ESP32/sub' --payload ${GREEN}
sleep 3
echo Im blue daboodeedabooday.
aws iot-data publish --topic 'ESP32/sub' --payload ${BLUE}
sleep 3
echo Somewhere over the rainbow.
aws iot-data publish --topic 'ESP32/sub' --payload ${RAINBOW}
sleep 3
done
And here is what that looks like in action:
Pretty nifty…
As you can tell it is quite responsive, the latency is negligible. Which is especially impressive if you consider that I am located in New Zealand, and the AWS IOT CORE service is in Australia. That encoded packet is send through the Tasman sea, gets processed by AWS, gets sent back to NZ, and is picked up by my ESP32 in about a second. I consider that pretty impressive.
Stay tuned for part 3 of this series where I will seriously upscale the amount of leds, im not kidding, its huge, tremendous, im talking 1024 leds. I will also be creating some awesome AWS services to decode images and turn it into juicy JSON which then gets send to IOT CORE and my ESP32.
And finally here is a git repository with some of the code I have created for this project, it might save you the time of copying and pasting from this site.